If you prefer to watch a video instead of reading the guide, feel free to do so. There is a playlist that covers
every trophy on my YouTube channel. If you'd like and subscribe or even become a member, it would mean a lot to
this channel!
Level 1 - Parisian Back Streets
It is recommended to collect everything needed for trophies during our first playthrough. We have to evade
dog
attacks for Good Boys and are also not allowed to kill them. Take a look at all silly deaths for
Darwin Awards as well. In
addition to that we have to collect all health items (Tactical Medicine) including chocolate
bars(Chocollection), notebook entries (Memento Mori), 3500€ (Cash Overload) and 4
specific weapons (Two of Every Kind). We are not allowed to eat the chocolate bars.
The first death for Darwin Awards has to be done here. We to let the leashed dog kill Lara.
Reload afterwards and evade all dogs throughout this level to work on Good Boys. It is
recommended to pick up everything, because we can sell a lot of stuff later to get closer to 3500€. Here
we can find 3 chocolate bars and 5 health items. The chapters of my video show you which items can be sold
for Cash Overload and where all items can be found.
Parkour!
Finish your training in the back alleys

With the patch of April 2025 Aspyr should have fixed this trophy. Before that it
was necessary to take a very specific route to unlock it. Now you should be able to get it by just
following Lara commands until you reach the ladder opposite of the level exit. If that doesn't work,
take this route, because it always works:
- Climb the bin, grab the platform and move ahead.
- Go through the door, ignore the ladder and climb over the railing as prompted (DO NOT Jump).
- Push the box to the pipe, climb up, and continue to the left platform. Jump to the wire to
grab the key.
- Descend safely, open the right door, and crawl under the fence to collect the crowbar.
- Immediately return to the start, but this time, ascend the ladder.
- Go through the window, search both kitchen drawers, and open the cabinet with the crowbar.
- Leave, move to the fan and climb up to collect the gold coins.
- Jump to the adjacent building and take the chocolate.
- Navigate around by climbing the pipe and shimmying to reach the roof.
- Open the nearby small building using the crowbar, search the cabinet, and collect the gun.
- Pull the object away from the roof area, descend safely, and pick up the second crowbar.
- Shimmy over to the closed door area. After picking up the gun, Lara is strong enough to do
it.
- Near the corner, stealthily latch onto the wall, quickly release, and silently obtain the
key.
- Open the door and climb down the ladder.
Level 2 - Derelict Apartment Block
There is no trophy that we can unlock in this level. But we have to collect our first Vector R35 for Two
of Every Kind, 1 chocolate bar and 3 health items.
Level 3 - Industrial Rooftops
Here we have to avoid getting hit by dogs for Good Boys and collect 1 chocolate bar as well as 5
health items. Save at the end of this level, because you won't be able to save in the next level before you
spoke to Carvier.
Level 4 - Margot Carvier's Apartment
In this very short chapter we have to collect 1 health item.
Crime Spree
Be rude to Mlle Carvier and clean out her apartment before the police show up
on the floor

After successfully being rude, she will refuse to hand over the notebook. We are
then granted about one minute to search her apartment for the notebook and various valuable items,
which we can later pawn for cash. Here is a list of the relevant items:
- Health Pills
- Diamond Ring
- Vintage Cognac
- Hip Flask
- Von Croy's Notebook
Level 5 - Parisian Ghetto
Here we have to collect 28 notebook entries and a small medipack in St. Aicard's church. But you don't
have to do it now, we are going to revisit this area a little further below.
Cartophile
Examine all the Parisian Ghetto maps

To collect all three maps in this area, follow these exact steps after talking
to Janice:
- From our starting point, cross the street and head left. The first map is mounted on the
right wall as we move down this street.
- Return to our original location, then go up the stairs directly across the street. At the
top, look in the middle of the square to find the second map sign.
- Next, turn around from the second map and proceed towards the street ahead. Take a right
turn, and follow the street until you see St. Aicard's Church.
- Across the street from the church, there is a gate with a "Metropolitan" sign. Enter the
gate and in the small garden inside, find the third and final map.
Level 6 - Le Serpent Rouge (First visit)
Talk to Bernard, create a save and make your way to the location he describes. We just quickly need to
play through Le Serpent Rouge to get Spendthrift and Pluie Noire. After we got those, we
reload our save.
Coup de Grâce
Open fire on an enemy and finish him off in melee combat

On Bernard's route one guard will investigate the room before we enter the dance
floor area. He's a very good target for this trophy. If it doesn't work, try to get it on Pierre's
route later.
Draw a gun and shoot at the opponent, landing at least one hit, holster the weapon immediately after
that and rush toward the opponent and get into melee range. Once close, repeatedly press

to execute
a combo. Continue until Lara knocks the opponent out.
Hit the Floor
Drop the metal structure on the dance floor before security is aware of your
presence

- Approach the dance floor without alerting any enemies.
- Do not flip the music switch, leave it untouched to avoid drawing guard attention.
- As soon as we enter the room, move immediately to the right and hide behind a nearby box.
- Observe the patrol patterns of the two guards in the disco hall from our hiding spot.
- Wait for an opening, then stealth takedown one guard and hide again.
- Repeat the process for the second guard.
- Climb the stairs on the side, push the required block into place, and climb up to the metal
structure overhead.
- Proceed along the structure until the large section collapses to the floor, this is the
moment that triggers the trophy, as long as we haven't been spotted at any point.
Level 5 - Parisian Ghetto (again)
After Le Serpent Rouge we return automatically to Parisian Ghetto. Make an additional save but don't
overwrite the one you made after talking to Bernard. Get Spendthrift, reload this save to get
Pluie Noire and then reload the original backup save and continue from there.
Spendthrift
Enter the graveyard without giving the trinket box to either Pierre or Bernard

When facing St. Aicard’s Church, look for the gated entrance on the left.
The doorman, who wears large chains and stands by this gate, is our contact for entry.
Walk up and begin the conversation, we must have the Trinket Box and €800, before he lets us enter.
Pluie Noire
Learn the password

We learn the password if we accept Bernard's quest and take his way into Le
Serpent Rouge to obtain the Trinket Box and return it to him.
- From the starting point near Janice, turn right and walk all the way to the end of the
street.
- Take a left up the sloped road.
- At the top, we’ll see St. Aicard’s Church. Directly across from the church, find a gate with
a "Métropolitain" sign and enter it.
- Inside the park (Parc de la Lune), locate Bernard at the back. Save before speaking to him,
and be sure to use polite dialogue options so he agrees to work with us and doesn’t take our
money for nothing.
- Bernard will task us with infiltrating Le Serpent Rouge to retrieve the Trinket Box. He’ll
give us the Ex-Janitor’s Key and update our notebook during the process.
Player Three Connected
Surprise the boxers

We can obtain this trophy inside St. Aicard's Church:
- Push the stone block near the statue to the left, behind the ring.
- Climb onto the block, then up the adjacent wall.
- Scale the rocky wall to enter the alcove on the top level of the church.
- Face the beams, hold walk, and press jump without moving forward to clear the gap safely.
- Hang from the ledge above the boxing ring and let go to trigger the trophy, but be aware
Lara dies instantly.
Bet Girl
Obtain the Gold Watch

We can obtain this trophy inside St. Aicard's Church:
- Save before talking to the coach and progress through all dialogue.
- Select either boxer when asked who will win.
- Watch the cinematic until the fight result is shown.
- If our boxer wins, we receive the Gold Watch and unlock the trophy.
- If our boxer loses, we lose 200€, then you want to reload the save and try again.
- Results are random, so keep betting until you get the watch. Odds seemingly are roughly
balanced.
Nehushtan
Buy the antidote from the herbalist

The herbalist is on our left side when we exit the church. Run up some stairs to
enter his shop.
- Talk to the herbalist to open the shop menu.
- Purchase the antidote for 50€.
- The antidote removes poison gas damage over time.
- Other healing items are optional and not needed for trophies.
- If desired, make a save before purchase and reload after unlocking the trophy to keep your
money.
Level 6 - Le Serpent Rouge (Second visit)
This time we take Pierre's route, because it offers an additional chocolate bar, we couldn't obtain on
Bernard's route. In total we need to collect 5 chocolate bars and 2 health items.
Level 5 - Parisian Ghetto (again)
After Le Serpent Rouge we return automatically to Parisian Ghetto. Before delivering the trinket box to
Pierre, we need to take care of the following two trophies and enter Bouchard’s hideout to collect an
additional large medipack as well as some more valuable items to sell. When talking to Pierre we get our
29th notebook entry.
Cash Overload
Earn more than 3500 euros

During the early levels of the Paris chapter, we have to collect Euros. These
come either as money
pickups that are added directly to our total or as items that we can later sell to the
pawnshop. To unlock this trophy, we must gather almost all available money, we can only miss about
300€ worth of pickups.
The pawnshop is located in the "Parisian Ghetto". From the point where we first enter the hub
area beside Janice, we turn left and follow the street to its end. Enter the door on the right to
find the pawn shop. Inside, we can talk to the owner to sell any items we have collected.
Healing items and ammo cannot be sold, but all sellable items are safe to part with since they are
not required elsewhere.
Unlike healing items and chocolate bar, the game does not provide an breakdown of possible earnings
per level. Therefore I would recommend to watch the videos of the first levels. I made timestamp for
every pickup. After the trophy popped, feel free to buy anything you like while keeping Pawn
Promotion in mind, but keep 800€, we need
them in Prague.
Pawn Promotion
Buy all the gun accessories at a pawn shop

Inside the shop speak to the pawnbroker.
Two special upgrades are available for 500€ each. The first improves Lara’s
stealth (Silencer), while the second extends her weapon lock-on range (Laser Sight), allowing her to
target enemies from
farther away. Together, both cost 1000€.
Level 7 - St. Aicard's Graveyard
We have to collect 4 health items and one chocolate bar. The graveyard is the third level with dogs, we
need to evade for Good Boys.
Kleptomaniac
Obtain the Sports Watch

After completing the quest for Pierre and delivering the trinket box to him, we
gain access to an apartment owned by a
woman. To reach it, we leave the restaurant and turn left to return to the street. Continue
forward while watching the wall on the left. About halfway down, we find a door with a keypad. We
enter the code Pierre provided (15328) to unlock the door. Inside, we encounter a woman with a large
cabinet behind her. The Sports Watch is located in the
left-hand drawer of this cabinet. The right-hand drawer contains a healing item.
Death-Defying
Get V-Packer ammo in St. Aicard's Graveyard

To get this special box of shells we need to take the following route, once we
dropped from the balcony:
- Jump onto the next tall crypt on the left side after the starting crypt.
- Jump across to the tall crypt on the opposite path.
- Continue with one more jump to the next crypt.
- Make a running jump to reach the final crypt and drop into the enclosed area.
- Open the large crypt inside to obtain the strength upgrade.
- Climb back out and return to the crypt we used to get here.
- Position Lara at the far back left (facing the apartment wall).
- Turn 180 degrees, shuffle three steps forward.
- Turn ~135 degrees right and save your progress here.
- Side flip to the left. If done correctly, Lara lands in the courtyard beyond the deadly
fence and the ammo can be
collected.
Level 8 - Bouchard's Hideout
During this level we need to collect one medipack, one automatic notebook entry and the second of three
required silly deaths. They latter occurs when we give rude answers after meeting Bouchard.
Let Pit Be
In the Bouchard's Hideout do not fall in the pits

To finally find Bouchard, we have to cross four different pits along the path
without falling into one of them.
- Take care of the first rat at the start of the level or ignore it.
- Keep running as the curving hallway floor collapses. By using a running jump we can get across
easily.
- At the next large gap, jump up to the pipe on the right, far-left
position, then climb left to cross safely.
- Switch to walking as you turn the next corner to avoid falling when the floor gives way.
- Clear the short new gap with either:
- A slightly early running jump to avoid the slope, or
- Jump + grab immediately from the slope surface.
- For the final pit, grab the dangling wire and traverse to the center block.
- Take two walking sidesteps right, then do a standing jump forward before the floor collapses.
- From the landing platform, simply turn to the right and jump forward or side-flip to reach
stable ground.
Level 9 - Louvre Storm Drains
After surviving the pawn shop, we'll find ourselves in the sewers. Here we can shoot the first rat with
our newly acquired K2 Impactor to tase our first little enemy for Electrocuties. Apart from that
we have to collect one healing item and one chocolate bar. The 31st notebook entry should unlock
automatically at the start of the level.
Super Lario
After opening the first valve in Louvre Storm Drains open all others in 5
minutes
or less

- Valve 1: Crawl into the vent after disabling the fans and save before
opening the valve.
- Valve 2: Exit, turn left, cross to the opposite tunnel, find it in the left
hallway.
- Valve 3: Return to the main room, climb the pipe to the next floor, walk
the beam to the valve. Water fills the center hole after opening it, drop in and swim on.
- Valve 4: In the tall room, climb up the broken walkway, reach the wire, let
go above the central beam and turn the valve.
- Valve 5: Climb back up via the wire, cross to the far side, climb a broken
walkway to the next floor, then jump over a small gap to the valve.
- Valve 6: Backtrack to the first climb spot, do a running jump to the
catwalk, go through the hallway into the large room. Jump to the dangling wire and cross
right to reach the last valve.
- If all six are activated within 5 minutes, the trophy pops right away.
Level 10 - Louvre Galleries
In this level we'll get notebook entries #32 & #33. Make sure to pick up the second Vector R35 for Two
of Every Kind after the room with the respirators. In addition to that we have to collect 5
health items.
Corner Frag
Defeat an enemy by shooting from around the corner

This trophy can be unlocked at several points in the game, but a
convenient place to do it is during the Louvre Galleries. By this stage, we already have access to
the
K2 Impactor. Enter stealth mode near one of the many columns, then place Lara’s back against a wall
for cover by pressing
. From there, we can
peek
around the corner and fire one shot at a guard with the tazer.
Ghost of the Louvre
Don't trigger the alarm in the Louvre Galleries

Not triggering the alarm means not getting spotted at all. Not by guards and not
by cameras and we need to stay away from red lasers. Luckily we can use the K2 Impactor to take out
the guards stealthily.
- Save frequently.
- Stealth kill or taze every guard as soon as you see them.
- Avoid normal bullets and the dart gun, as these can alert enemies.
- If we hear French dialogue, it means we were spotted. Reload your latest save in this case.
- The trophy pops automatically after exiting the level if nobody noticed Lara.
Level 11 - Archaeological Dig
Towards the end of this level we get our 34th notebook entry. All other pick-ups are optional as there
are neither chocolate bars nor any other health items.
Croft of the Blue
Stealthly defeat the guard at the bottom of the Archaeological Dig

After taking care of the enemies on our starting level, we need to climb down
the ladder into the dig site. This is where this trophy basically starts.
- Climb down the first ladder to the scaffolding.
- Turn right, follow the path, and descend the longer ladder.
- At the railing above the dig site, create a save.
- Jump over the railing right into the fenced area, so you get a better view of the guard.
- When he walks from right to left, run forward, and jump right into the guard’s circular
patrol area.
- Enter stealth mode and maneuver behind the guard.
- Watch for the hand icon to appear and press .
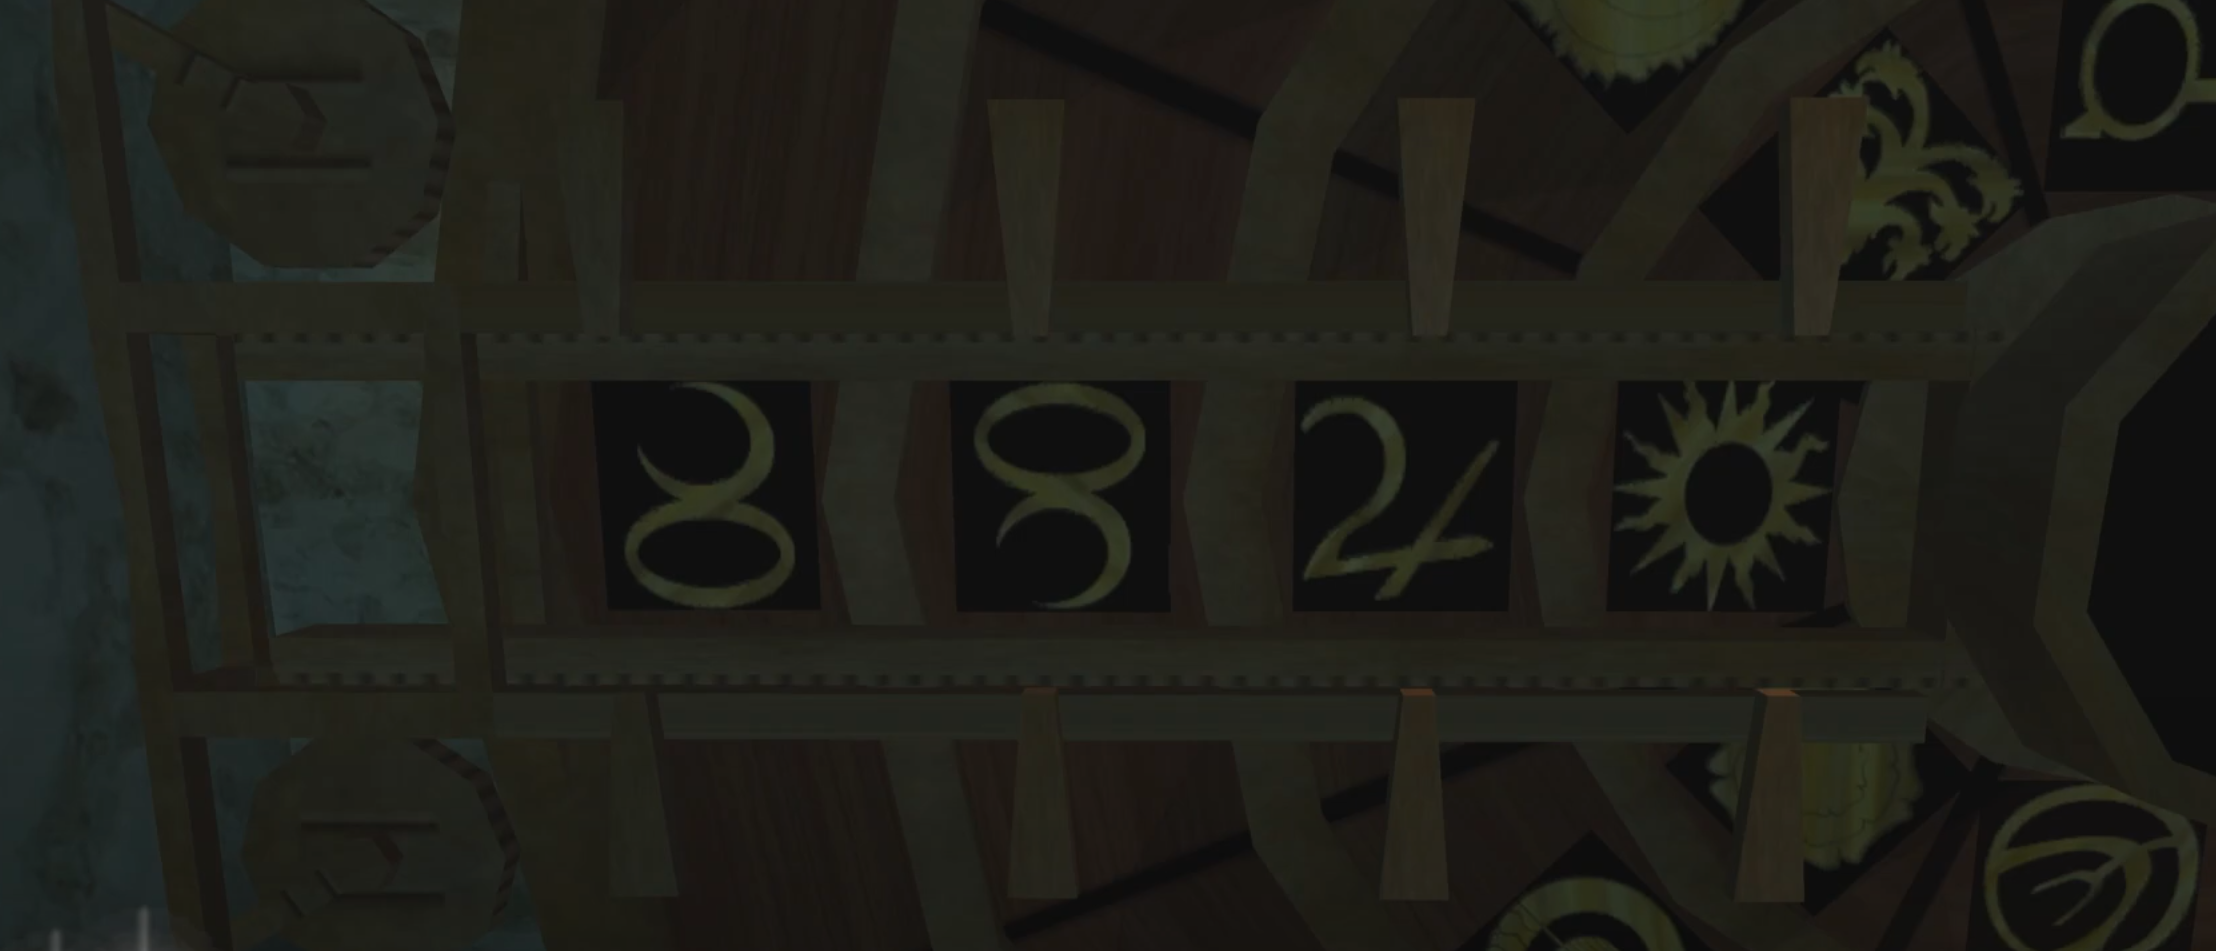
Jackpot!
Unlock the gate in the Archaeological Dig with no blocked rings on your last
turn

After automatically collecting the only notebook entry of this level, climb the
short stairs to the right of the wheel to find four additional levers. These control locks on the
wheel’s rings, from left to right. The outer ring through to the innermost ring. Pulling a lever
locks the corresponding ring, while pulling it again unlocks it. Multiple rings can be locked at
once, and we can adjust them at any time. For this trophy however, we must solve the wheel puzzle
with no locks in place. It requires some
planning to line up the rings while keeping them free, but it is not difficult at all. Just make you
sure you lock the corresponding ring when you see one of the symbols below. When your puzzle matches
the picture, unlock all rings and turn them once more.
Level 12 - Tomb of Ancients
At the end of this level we'll get notebook entry #35. Make sure to collect the bandages on the way down.
In the Tomb of Ancients another multi-level spanning trophy starts, called This is Lara!. It's
our reward for shooting or kicking 17 different skeleton warriors into holes or off of platforms. I
recommend kicking it down the hole, once the trapdoor is open, because shooting it with the shotgun
kills it after a couple shots.
Fast and Curious
Get to the bottom of the Tomb of the Ancients in 3 minutes or less

The given time limit is very generous. Just follow the way and climb down. Once
you drop down onto the bridge you can take a shortcut by walking over the
railing of the broken bridge to save some time. If you're fast enough, the trophy should pop upon
reaching the sandy floor with the skeleton warrior.
Electrocuties
Defeat two different non-human enemies by tasing them

We can get this easily by using the K2 Impactor on a rat in the Louvre Storm
Drains
level and a bat in the Tomb of Ancients.
High-Flying
Pass through the trap corridor in the Tomb of the Ancients with one swan dive
and
no damage taken

At the end of the level, we pass through a rocky tunnel and arrive in an ornate
hallway. Once we step inside, the door closes behind us and traps begin to trigger. A lever is
which opens the exit door is directly to our right. Make a save before pulling it.
Our goal is to reach the far side before the exit closes, pulling this off without taking damage and
while performing at least one swan dive. The swan dive is executed by pressing Forward +

+

together.
If you take damage, reload and try again.
The dart traps here fire slowly and are not much of a threat, so most of them should miss us
naturally. The real challenge comes from the three sets of horizontal spikes. To clear these safely,
we must use running jumps.
For proper timing, watch the floor. Each ornate design has a forward edge, followed by a dark
brown strip. Initiate the jump just as Lara reaches the front edge of the pattern, before
stepping onto the darker strip. With correct timing, she will clear the spikes regardless of whether
they are extended or retracted. Perform the swan dive during one of these jumps.
Level 13 - Hall of Seasons
There isn't much to do here yet. If you like you can knock the 3 skeleton warriors through one of the many
trapdoors for This is Lara!. It's not necessary now because they will respawn everytime we
re-enter the Hall of Seasons, which we do a couple times. They don't count multiple times, therefore it's up
to you when you deal with them as long as you do it at least once.
Level 14 - Breath of Hades
In terms of health items we must pick up 1 large health pack. When we're going for Two Steps a Hades,
we'll collect it as well.
Two Steps a Hades
Use only two pillars to take all the items in the Breath of Hades

The room contains 6 items in total.
- Turn right at the start and push the wall to reveal 2 Vector clips (1–2/6) and a lever that
raises the pillars.
- Make a running jump to the second pillar in the far left row.
- Hop to the final pillar in the far left row when the wind is calm and the pillar tilts
toward you.
- Use a normal jump to far ledge to collect Air Crystal (3/6).
- Jump back to the pillar you cam from.
- Turn right and jump to the alcove with a medipack & 2 V-Packer clips (4-6/6).
- Jump back to the door to leave this room using only the pillars you used before. The trophy pops
upon exiting the room.
Level 15 - Neptune's Hall
During the underwater sections of this level we need to collect 3 large health packs. Early on we come across
another skeleton warrior. Kick it off the ledge to work on This is Lara!.
Be Like Water
Do not get any damage in the Neptune's Hall

Obviously saving after every trap is recommended. The most difficult parts are the
skeleton warrior and the spiked hallway after the third health pack. All traps in the hallway require
some luck because of some buggy
hitboxes.
Level 16 - Sanctuary of Flame
The room contains one set of Bandages. To collect it we need to obtain the fire crystal first. Looking
from the crystal to the entrance, it's located on the left side of room.
Play with Fire
Cross the Sanctuary of Flame before it is completely engulfed in flame and stay
alive

When we first enter this level, we step forward into a large chamber filled with
oil and scattered platforms. A short cinematic plays, showing lava flowing down toward the platform
we are standing on. Make a save here, since it is impossible to complete both trophies on the same
attempt.
We only have about 20 seconds to reach the Fire Crystal before the lava reaches the oil and ignites
the whole pool. Jumping into the oil before it burns also causes instant death, so timing and
precision are critical. The falling lava and bursts of fire do not cause damage and simply act as
distractions.
From the start platform, make your way down to the final tile just before the oil. From here, stop
running and complete three standing
jumps across the platforms. After the third standing jump, turn right and leap to the nearest
platform. As soon as you land,
continue running to perform a jump onto the staircase at the far end of the pool. From there, move
quickly to the upper floor, then interact with the Fire
Crystal in the alcove to secure the trophy before the oil ignites.
Rocket Woman
Take off on five different blocks without taking damage in the Sanctuary of
Flame

Reload the manual save you made before going for Play with Fire. We can find
several special floor blocks that launch us
upward when stepped on in the starting area. Ride
each block about halfway up, then drop back down to the floor by rolling over the edge. If we go too
high, Lara will take
fall damage when landing and the attempt will not count toward the total.
On PS5, this process is much easier thanks to the built-in trophy tracker, which increases by one
each time a successful block is registered. On PS4 however, there is no tracker. Because of this, it is
recommended to cycle between the same
five blocks, ensuring the timing and drop height are correct for every attempt to
guarantee they register.
Level 17 - Wrath of the Beast
The fourth elemental room contains one set of bandages just to the right of the entrance. After
collecting the crystal the 3 skeleton warriors will appear, which we all have to push through the hole
in the middle of the room to keep working on This is Lara!.
Live Dangerously
Do not use the right ledge in the Wrath of the Beast

This level is short but focused entirely on crossing chasm while all platforms
collapse. From
the start, follow the path down and left. Make your way along the left wall and climb up the
platforms counterwise until you can reach the final platform where you can collect the crystal.
Level 13 - Hall of Seasons (revisit)
If you haven't knocked the three skeletons into a hole yet, do it now. In addition to that, we have to
push 1 skeleton warrior off the ledge in the basement and 4 more when we reach the upper level in the
main room. The basement and the upper level including the bossfight area contain a total of 4 health items
and there is an additional
one in the flooded Tomb of Ancients we reach after the bossfight. In that bossfight we also get notebook
entry #36 automatically.
Ghost in a Nutshell
Get Brother Obscura's painting in 1 minute or less without being hurt

We can deal with him normally by shooting, with the V-Packer Shotgun being the most
effective. His
only attack is a forward dash that damages us if we are standing upright. To avoid this, duck as
soon as you see him preparing to charge. If we take any
damage, we need to reload and try again.
Near the end of his health bar, pause to locate the statue with a blue glow shining from the
front. Its position is random and changes if we approach too closely before the boss is down. Position
yourself close to the glowing statue but not too near to reset its
location. Then, while in this
position, finish off the boss and holster your weapon. Immediately run to the glow and
interact with it to claim the Brother Obscura Painting. With the painting collected, the main
door opposite the statues opens. Make a run for the exit, Obscura rarely lands a hit during this escape.
Reaching the stairs beyond completes the
requirements, unlocking the trophy. If you're attempting Tactical Medicine in this playthrough,
you must play through the fight again after unlocking this trophy as there is a large medipack behind
one of the pillars.
Level 18 - Galleries Under Siege
For Tactical Medicine we need to collect one set of health pills.
More Gas, More Mess
Escape the Louvre without using a respirator, healing or leaving any
Gunderson's
men alive

Probably the most difficult/annoying trophy of the entire game. Video guide is
recommended to see the health bar at certain checkpoints. We need to eliminate 8 guards before the
respirator and 9 more after picking it up.
The main objective is, that we have to do this without ever using healing
items or equipping the respirator. The respirator still needs to be collected to progress through a
door, but activating it voids the attempt. That means we gotta be really quick and efficient.
Oxygen will steadily deplete throughout the stage, and once it runs out,
our health begins to drop. Entering this section with as much health as possible can make the
difference between success and failure. It's recommended to rely on powerful weapons to minimize risks,
for example a combination of the Desert Ranger and
the V-Packer shotgun. Antidote kits are permitted and should be used if you get poisoned, since
poison damage could otherwise ruin a good attempt. Saving is allowed, but we should only do so when in a
solid position.
Level 19 - Von Croy's Apartment
During this level we unlock notebook entries 37 & 38. For Tactical Medicine we need to collect 6
health items. Additionally we must collect 1 chocolate bar.
Room Service
Defeat the cleaner

Story-related. To trigger the boss, you must pick up the Rigg pistol and Von
Croy's Walking Stick from his apartment. He has three stages, but shouldn't be a problem on a normal
playthrough.
Level 20 - Monstrum Crime Scene
After the conclusion of Von Croy's Apartment we change the scenery. This is the first level in Prague. We
need to obtain our first Scorpion X required forTwo of Every Kind. In addition to that, it is the
fourth level with dogs to evade for Good Boys. Apart from two health items we must collect notebook
entries #39-#46.
Automatic From Luddick
Buy the Scorpion X gun

When we first meet Luddick, we must choose at least three of the following five
friendly options in the dialogue to be able to buy the gun at the end of this level:
- The one you're watching? With police tape all around it.
- I gather Vasiley was some kind of art dealer.
- Keep talking till the money runs out.
- All of them?
- OK, while you're on your errand I'm going to start with Vasiley's
Once we have met these requirements, we only need to finish the level. At the final
cutscene, we will meet Luddick again. This time there are no dialogue choices. If we were polite
have at least 800€ in our inventory, Lara automatically
purchases the Scorpion X, unlocking the trophy.
Level 21 - Strahov Fortress
Here we can finally finish two level-spanning trophies. It's the final level with dogs to evade for
Good
Boys and we can obtain our second Scorpion X required for Two of Every Kind. In addition
to that we need to get notebook entries #47-#49 and collect 2 health items & 1
chocolate bar.
Silent as a Mouse
Don't draw too much attention to yourself in the Strahov Fortress warehouses

At the start of the Strahov Fortress level, we encounter six armed guards spread
across the first two rooms. Some can be avoided, but others need to be neutralized to proceed. If we
are aiming for all pickups, then every guard must be taken down. With patience, each one can be
dispatched through stealth.
The achievement unlocks once we reach the green door at the end of this section. Based on how the
game tracks progress, we must reach this door without ever being spotted by a guard, which means
using only stealth takedowns or avoiding them entirely.
Snake Eater
Why are you still here? Just to suffer?

In the second area with armed guards, we find a long ladder
along the back wall. There is nothing important waiting at the top, but for the trophy we simply
need to climb all the way up.
Two of Every Kind
Find a pair both for Vector R35 and for Scorpion X guns

- Vector 1: Found inside the hut on the roof in the Parisian Back Streets
level (same location where we obtain the first strength upgrade).
- Vector 2: Located in the security guard’s office in the Louvre Galleries
(the same office with the camera system used to find Carvier’s office password).
- Scorpion 1: Purchased for 800€ from Luddick after completing Monstrum
Crime Scene.
- Scorpion 2: Collected either from Luddick’s body or his bed during the
Strahov Fortress level. The trophy unlocks instantly upon pickup.
Reel Deal
Bypass the laser trap in the Strahov Fortress without jumping or crawling

At the end of the Strahov Fortress level, we reach a hallway filled with laser
traps. Near the start of the hall, there is a gas tank we can shoot. This triggers a large cable
spool to roll down the hallway — it is our cover from the lasers. Our objective for this trophy
is to cross the hall alongside the spool, shifting sides as needed to stay safe behind it.
The first lasers fire from the left, so we move to the right side of the spool for cover.
The second set fire from the right, which requires moving to the left side of
the spool. Because the spool rolls close to the left wall, positioning here can feel very tight. We
can try moving ahead of the spool, but it’s often more consistent to stay behind it and carefully
adjust.
The third and final lasers fire again from the left, so we need to return to the right side. This
section is
much easier because there is more space to work with.
Good Boys
Do not kill any of the dogs or take any damage from them through the whole
walkthrough

This trophy is simpler than it sounds: We just need to finish the game
without killing or being damaged by any dogs. Importantly, we don’t have to encounter every single
dog, only the unavoidable ones matter. By knowing where they appear, we can plan our route to
bypass them safely.
- Parisian Back Streets: At the start, there is a chained dog. We simply avoid going near it.
- St. Aicard's Graveyard: There are two dogs in the graveyard. Since dropping to the grass is
not
required, we stay atop the tombs and move forward without issue.
- Monstrum Crime Scene: One dog patrols the back of an alley near the trapdoor to the sewers.
We sneak
down whichever side path the dog is not occupying.
- Strahov Fortress: This is the trickiest section. Two dogs are contained behind an electric
fence
halfway through. Fortunately, we only need to cross the floor once here. We carefully run
straight
across to the ladder to avoid them.
If we reach the end of Strahov Fortress without ever hurting or being harmed by a dog, the trophy
unlocks.
Level 22 - Bio-Research Facility
To keep working on Tactical Medicine we need to find 7 health items here.
Unnatural Selection
Defeat all the mutants in the Bio-Research Facility

Early in the level, we enter a large room containing several cylindrical tanks
with mutants inside. A cutscene will play showing one mutant breaking out of a tank. Our task is to
defeat all 11 mutants within this space. The best weapon for this is the
Viper SMG. The mutants attack only in
melee, so maintain distance to stay safe. If we get hit, the poison status caused will slowly drain
health which we can counter by using a Large Medipack or Poison Antidote.
One guaranteed way to spawn all mutants is by shooting and breaking one of the central tanks.
After defeating all, pause and check the Statistics menu to confirm the kill count reads 11. With
that done, finish the level normally and the trophy should unlock during the final cutscene.
Into the Hellmouth
Swan dive into the Leviathan's reservoir

In the big room with stairs, walkways, and the pool below
with the Leviathan we must perform a swan dive into the pool. This action triggers the
trophy directly.
Perfect Mimicry
Do a handstand in front of the flowers in the main botanical greenhouse

To perform the handstand after the short cutscene where Lara remarks, "This ledge
looks too far. I don't think I'll make it yet," we proceed as follows:
From the cutscene location,
walk to the broken edge of the catwalk and hang onto it. Then, press and hold
+ Forward +
simultaneously to have Lara perform a handstand on the ledge.
Level 23 - Sanitarium
We visit the Sanitarium as Kurtis and have to pick up 2 health items & 3 chocolate bars. There isn't much
more to do, so use the time to get used to Kurtis' movement.
Level 24 - Maximum Containment Area
In our second level with Kurtis, we can get two more multi-level spanning trophies done by picking up the
final 2 chocolate bars and dying in a specific way. In addition to that we must find 1 large health pack for
Tactical
Medicine.
Darwin Awards
Find all the silliest ways to die

- Chained Dog Death (Parisian Backstreets) -
We must be killed by the chained dog in the first level. To do this, progress straight through
the
opening section until reaching the area with the dog. Allow the dog to reach and attack us for
the
death
requirement.
- Bouchard’s Hideout – Rude Response -
When meeting Bouchard for the first time in Bouchard’s Hideout, choose the rudest and most
aggressive
dialogue replies. This will make Bouchard hostile, resulting in our death.
- Kurtis – Poison Water Death (Maximum Containment Area) -
As Kurtis near the start of Maximum Containment, approach the area with the poison water. Enter
or
fall
into the poison water section intentionally, which will kill Kurtis.
Chocollection
Get all the chocolates in a single walkthrough, but do not eat any of them

We have to collect a total of 20 chocolate bars from Parisian Back Streets until
Maximum Containment Area. Before finishing a level just take a look at your stats to see if you got
all of them for that level. Every chocolate bar has a timestamp in my video guide, so you don't have
to watch entire levels to find them.
Great Flood
Defeat Proto-Nephilim

Story-related. Pops automatically after the boss fight in Maximum Containment
Area.
You're Just a Monkey
Defeat the Proto-Nephilim without using Boran X or healing

Once we step through the double doors at the end of the level, the boss encounter
with the Proto-Nephilim
begins. Kurtis automatically wields his Chirugai, which allows us to generate a psychic shield at
the press of a button. This shield can be activated repeatedly without any noticeable cooldown, so
we should refresh it consistently to reduce incoming damage.
The Nephilims behavior is straightforward, it closes the distance and strikes with its claws. While
individual hits are not heavily
damaging, especially when the shield is active, the damage can add up over time, so maintaining the
shield is essential. For this fight the Chirugai throw is our best option. It delivers good damage
output
and allows us to return to shielding more quickly than the melee combo.
Level 25 - Aquatic Research Area
In this level we regain control over Lara and have to collect a small medipack for Tactical Medicine.
Short Ration
Finish the Aquatic Research Area without feeding the Leviathan

At one point in the level, we reach an option to drop a bucket of chum into the
water. Instead of doing this, simply exit the level and continue without using the chum.
Level 26 - Vault of Trophies
Towards the end of this level we meet 2 skeleton warriors that we need to draw out of the room to push them
in the chasm for This is Lara!. Furthermore we must collect notebook entries #50-#54 and 2 bandages.
Won't Catch a Breath
Get the aqua-lung and hold your breath until the end of the water section
without
losing health

We can obtain this by completing the section without using the Aqua-Lung. The
item is located in a small air pocket just before the wall we need to kick through to reach the
statue area. Once inside, there is another kickable wall leading to an additional air pocket.
In this chamber, we must pull the chains behind Lemieux and Vasiley. After doing so,
swim upward into the opening. As long as we avoided taking damage from a lack of air and did not
equip the Aqua-Lung, the condition is fulfilled. If you still have a respirator from the Louvre in
your inventory, you can use it to make it even easier.
Level 27 - Boaz Returns
Here we just need to win the bossfight. There is nothing trophy-relevant to collect.
Dodgeboaz
Evade all of Boaz's projectiles without attacking her during the shelling phase

When Boaz's health drops to 75%, she begins moving from side to side and spits
green projectiles. Simply avoid these attacks without firing back and without taking damage. The trophy
should pop immediately when she leaves her shelling phase and comes after Kurtis again.
Took Care
Defeat Boaz

Story-related. Unlocks automatically after the Boaz boss fight.
Level 28 - Lost Domain
In this very short level that leads to the final one, we get notebook entry #55 and must find a large health
pack.
Level 29 - Eckhardt's Lab
This is it, the final level of the game. Here we can pick up the final 2 health items, notebook entries
#55-#62 and kick/shoot the last 2 skeleton warriors down a hole for This is Lara!.
This Is Lara!
Send all undead knights into the pits

From the middle of the game through to the final level, we encounter
skeleton warriors. These enemies are pretty durable, they can either be knocked down with the
shotgun or melee attacks.
Every encounter with skeleton knights includes pits
into which they can be forced. Knocking all 17 off of a ledge rewards us with this trophy.
To do this, we first position ourselves so the skeleton is lined up between us and the pit. With
guns holstered, repeatedly strike using melee
attacks. These combos
stagger the skeleton backwards until it eventually falls into the pit. An alternative method is to
use the shotgun, though some skeletons may actually die from shotgun
blasts instead of being knocked back. In those cases, they will not count but it is still worth a
try especially when you have to face multiple skeletons at the same time. It is also possible for
skeletons to fall into pits on their own while chasing us, those accidental falls do count.
- Tomb of Ancients – 1 Skeleton
- Hall of Seasons – 3 Skeletons
- Neptune's Hall – 1 Skeleton
- Wrath of the Beast – 3 Skeletons
- Hall of Seasons Underground – 1 Skeleton
- Hall of Seasons Upper levels – 4 Skeletons
- Vault of Trophies – 2 Skeletons
- Eckhardt's Lab – 2 Skeletons
Tactical Medicine
Collect all medipacks in a single walkthrough

This can't be earned in NG+. For this trophy we need to collect all 70 health
items of the game (chocolate bars don't count towards this). I provided the number of health items
per level in the subheadlines of every
chapter in this guide. The one in the sewers between Bouchard's Hideout and Parisian Ghetto as well
as the one in St. Aicard's church used to respawn. If you collect them you could unlock the trophy
in Vault of Trophies already. However, I wouldn't recommend relying on any glitches in this game.
Every video has timestamps for all regular health items.
Shut Him Up
Defeat Eckhardt

Story-related. Unlocks automatically after succeeding in the final boss fight.
Great Work
Defeat Eckhardt without going to the ground or taking damage

This trophy can be made easier by saving after every successful dodge and
reloading any time we get hit. During the encounter, we face three main attack types:
- Fire attack: Easiest to avoid. Simply jump over it as it travels along the floor.
- Falling rocks: Shadows on the ground indicate where rocks will land. Watch for the
shadows and
quickly move into a clear space to avoid damage.
- Blue lightning attack: The most difficult to dodge. It moves slowly at times and lingers,
covering a
wide
portion of the floor. Timing jumps is tricky, as landing on a section still fading away
results in
damage. The most reliable strategy is to create as much distance from Eckhardt as possible.
From
there, perform a running jump over the lightning, ensuring enough distance to avoid
landing on
it. We must also be careful not to touch the force field around the arena, as it damages
Lara.
When Eckhardt summons clones, avoid standing directly in front of them as they rush to the center
of the room. Once this sequence ends, wait for Eckhardt’s next attack to finish before moving in
close to kick him. Saving after each cutscene and retrying as needed provides a safe way to secure
the trophy.
Memento Mori
Collect and read all the notes in Werner's notebook

We need to collect all 62 notebook entries across the game. Some of these trigger
automatically when
entering a level, others require interaction or dialogue sequences. In the remaster, several entries
from the original version were merged into one, while new entries were also added. Below is the full
list by level, including numbering.
Level 4 – Margot Carvier's Apartment (19 total)
- 1–19/62 – Automatically obtained when acquiring the notebook.
On New Game+ we immediately begin with the first 19 entries after loading the level, even without
physically having the notebook.
Level 5 – Parisian Ghetto (11 total)
- 20–21/62 – Talk to the homeless people after waking in the train, then climb up. When
jumping toward the City Guide we get two entries.
- 22/62 – Talk to the City Guide about Le Serpent Rouge.
- 23–26/62 – Speak to Janice for four entries.
- 27/62 – Talk to the Herbalist twice (first time gives nothing, second time adds an
unannounced entry).
- 28/62 – Conversation with Pierre at Café Metro (Bernard’s route should also give this).
Refers to retrieving a box from a broken rig.
- 29/62 – After recovering the box from Serpent Rouge, speak again to Pierre or Bernard.
Skipping straight into the church misses this.
- 30/62 – Conversation with Bouchard rewards an entry about passports.
Level 9 – Louvre Storm Drains (1 total)
- 31/62 – Automatically received upon entering the area.
Level 10 – Louvre Galleries (2 total)
- 32/62 – Automatically given at level start.
- 33/62 – Obtained either by collecting the security card in the drawer within the PC cabinet
or by interacting with the “Archaeological Dig Site” sign earlier.
Level 11 – Archaeological Dig (1 total)
- 34/62 – Triggered by approaching the puzzle.
Level 12 – Tomb of the Ancients (1 total)
- 35/62 – Earned near the end after the trap gauntlet. Reduced from two entries in the
original version.
Level 13 – The Hall of Seasons (1 total)
- 36/62 – Automatically gained after completing the side rooms, climbing up, and watching the
cutscene with the ghost boss.
Level 19 – Von Croy's Apartment (2 total)
- 37/62 – Awarded automatically when the level loads.
- 38/62 – Found by interacting with Von Croy’s Walking Stick near the start.
Level 20 – The Monstrum Crime Scene (8 total)
- 39/62 – Automatically upon loading the level.
- 40–42/62 – Speak politely with Luddick at his car.
- 43–44/62 – Interrogating Bouchard grants two entries. This must be done before he
disappears.
- 45/62 – After solving the clock puzzle, interact with the right-hand display case among
four.
- 46/62 – After collecting keys from Bouchard’s body, head through the garage red door and
outside. This adds a new entry.
Level 21 – Strahov Fortress (3 total)
- 47/62 – Automatically upon loading the level.
- 48/62 – After the crate-filled yard, approach the laser-locked door to obtain an entry about
the Biodome.
- 49/62 – After climbing past the steam-blocked fence with dogs, we receive this note
automatically.
Level 26 – Vault of Trophies (5 total)
- 50/62 – Kick down the wall to the underwater statue puzzle.
- 51/62 – Inspect the plaque in front of you within that puzzle space.
- 52–54/62 – In the library after platforming, approach the skeleton reading a book to receive
three entries.
Level 28 – The Lost Domain (1 total)
- 55/62 – Automatically awarded at level start.
Level 29 – Eckhardt’s Lab (7 total)
- 56–60/62 – After passing the spike trap and entering the laboratory, inspect the open book
on a table. This provides five entries.
- 61/62 – Automatically received at the start of the fight after acquiring the shard.
- 62/62 – Granted after defeating Eckhardt and picking up his glove.
I Feel Stronger Now
Finish Tomb Raider: The Angel of Darkness

Story-related. Unlocks automatically shortly after succeeding in the final boss
fight.
New Game+
As in all 5 prior games we have to beat NG+ in Angel of Darkness, too. This time it is way more challenging
than it was in the other two games of this collection.
Never Again
Beat the game on New Game+

You know all the levels by now and by the time I published this accompanying
text guide, Aspyr has already fixed a lot of problems. Therefore it might not be as hard as it used to
be.
The most significant change in New Game+ is the saving system. In the base game we can save freely,
but in New Game+ our saves are capped at 48 across the entire run. These saves are tied to the new
GPS item added to the inventory.
We can purchase up to 6 additional GPS units from the Herbalist in the Parisian Ghetto for 350€
each. This is the only way to increase the amount of saves. GPS items serve another crucial purpose:
they
are our only way of healing besides completing levels. Almost all healing pickups have been
removed, except for Chocolate Bars. However, bars cannot actually be consumed in this mode, leaving
them useful only for the separate
Chocollection trophy if we didn't manage to get it in the first
playthrough. Sometimes healing items are replaced by
extra ammo, but in many cases they are simply gone. Careful management of GPS items is therefore
very important to succeed in New Game+.
Enemies and certain bosses have been adjusted for higher difficulty, with increased health.
Auto-rifle enemies in particular can deal very high damage quickly, requiring extra caution.
From the start of Level 5 (Parisian Ghetto), we automatically begin with all weapons in the game
available, with two exceptions:
- No non-lethal weapon
- No dual wielding capability
Get as much ammo as possible for the Viper SMG before leaving the Ghetto, it's the most helpful weapon for most of Prague.
You Have Unique Strengths
Collect all trophies in Tomb Raider: The Angel of Darkness